Many modules' utests currently don't support enabling all
tests at once. Furthermore, some modules' tests are complex,
for example due to their numerous dependencies on other
modules. This makes it nearly impossible to enable all
tests with a single global switch. Consequently, the
previously defined `RT_UTEST_USING_ALL_CASES` has lost
its original meaning.

We recommend deprecating this configuration switch. If a
module needs to enable a group of functional tests through
its own configuration, this local enable all switch should
be implemented by the module itself, and a global RTT enable
switch will no longer be provided.

If such a requirement arises in the future, we recommend
careful design, especially considering how to ensure that
turning on a single switch enables all dependencies for
all involved modules for ease of use.

Signed-off-by: Chen Wang <unicorn_wang@outlook.com>
CanMV-K230 Board Support Package 使用说明
1. 参考文档
- 【参考 1】Canaan CanMV K230 文档: https://www.canaan-creative.com/k230_canmv/zh/main/index.html
- 【参考 2】K230 RTOS Only SDK 文档: https://developer.canaan-creative.com/k230_rtos/zh/dev/index.html
- 【参考 3】01Studio CanMV-K230 教程: https://wiki.01studio.cc/docs/canmv_k230/intro/canmv_k230/
2. 概述
CanMV 是一个由嘉楠科技(Canaan)官方创建和维护的开源项目。该项目将 MicroPython 移植到嘉楠科技边缘计算AI 芯片 K230 上,这就是 CanMV-K230 开发板。该项目旨在创建低成本,可扩展的,使用 Python 驱动的 AI 人工智能模块。
目前市面上生产的以 CanMV-K230 为原型的开发板有多种型号。本 BSP 支持 01Studio CanMV-K230 AI 开发板(内存 512MB)。
K230 是一款嘉楠科技(Canaan)出品的 64 位双核带硬件 FPU 和卷积加速器的 RISC-V SoC。
采用本 BSP 构建生成的 RT-Smart 和官方 SDK (【参考 2】) 配套使用并在大核上运行。
3. 构建
目前只验证了 Ubuntu/Linux 下构建。
$ lsb_release -a
No LSB modules are available.
Distributor ID:	Ubuntu
Description:	Ubuntu 22.04.5 LTS
Release:	22.04
Codename:	jammy
3.1. 安装 GCC 工具链
正确解压后(假设下载后解压在 $USER/toolchain, 也可以自己设定解压后的目录),导出如下环境变量,建议将这些 export 命令写入 ~/.bashrc。
export RTT_CC="gcc"
export RTT_CC_PREFIX="riscv64-unknown-linux-musl-"
export RTT_EXEC_PATH="$USER/toolchain/riscv64-linux-musleabi_for_x86_64-pc-linux-gnu/bin"
3.2. 安装依赖
3.2.1. apt 软件包
$ sudo apt install -y scons python3-pip u-boot-tools patch
其中 scons 是 RT-Thread 需要的构建工具;python3-pip 用于后续下载安装一些 python 软件包;而 u-boot-tools 和 patch 用于 rttpkgtool 打包。
3.2.2. 一些 python 软件包
因为本 BSP 只在 RT-Thread v5.1.0 以上才支持,所以需要确保本地已经安装过 kconfiglib。采用清华源是为了加快安装速度。
$ pip3 install kconfiglib -i https://pypi.tuna.tsinghua.edu.cn/simple
另外还需要一些软件包用于 rttpkgtool 打包。
$ pip3 install pycryptodome -i https://pypi.tuna.tsinghua.edu.cn/simple
$ pip3 install gmssl -i https://pypi.tuna.tsinghua.edu.cn/simple
3.2.3. Env
安装 env,具体参考 https://github.com/RT-Thread/env。
注意对于中国大陆用户,为加快速度,请使用以下命令,同时避免在 RT-Thread 内核仓库代码路径下执行以下命令,以免中间过程出现问题导致一些残余文件没有及时清理而污染内核代码仓库:
wget https://gitee.com/RT-Thread-Mirror/env/raw/master/install_ubuntu.sh
chmod 777 install_ubuntu.sh
./install_ubuntu.sh --gitee
rm install_ubuntu.sh
3.3. 下载 RT-Thread 并更新依赖的软件包
假设我们的工作路径是 $WS
$ cd $WS
$ git clone git@github.com:RT-Thread/rt-thread.git
$ cd rt-thread/bsp/k230
$ source ~/.env/env.sh
$ pkgs --update
3.4. 构建
在 $WS/rt-thread/bsp/k230 下执行如下命令:
$ scons --menuconfig # 默认不需要修改,直接保存即可,保存后可以达到同步最新配置的效果
$ scons -j$(nproc)
此时在 $WS/rt-thread/bsp/k230 下会看到生成了 rtthread.bin, 这个就是我们构建出来的内核二进制文件。
4. 采用 rttpkgtool 对内核打包
直接构建生成的 rtthread.bin 并不能直接用于启动,我们采用 rttpkgtool 对 rtthread.bin 进行二次打包生成符合开发板能够识别的格式。
可以从以下网站获取 rttpkgtool(注意需要切换到 for-k230 分支):
- 主站(github):https://github.com/plctlab/rttpkgtool
- 中国区镜像(gitee):https://gitee.com/unicornx/rttpkgtool/
为方便使用,在本 bsp 下提供了一份封装脚本 build.sh,可以直接执行后打包生成最终可以烧录的 opensbi_rtt_system.bin 文件。
但需要注意是,build.sh 只负责下载 rttpkgtool 并运行 rttpkgtool,但不会自动安装 rttpkgtool 依赖的工具软件,所以在使用 build.sh 前请仔细阅读 rttpkgtool 仓库的 “for-k230” 分支上的 README.md 文件。提前安装好一些额外的依赖和用于编译 opensbi 的交叉工具链(注意这个编译 opensbi 的交叉工具链和编译 RTT 的 工具链是不同的)。
本 README 的 “安装依赖” 部分已经尽量列出了 rttpkgtool 打包需要的依赖,如果按照其描述安装依赖后仍然遇到问题请参考 rttpkgtool 的 README 自行解决或者给 rttpkgtool 提 issue: https://github.com/plctlab/rttpkgtool/issues。
以上依赖和交叉工具链安装好后,可以执行如下命令进行打包:
$ cd rt-thread/bsp/k230 # 确保在本 bsp 目录下
$ ./build.sh
BSP_PATH: /home/u/ws/canaan/rt-thread/bsp/k230
rttpkgtool does not exist, clone it from https://gitee.com/unicornx/rttpkgtool.git
Cloning into '/home/u/ws/canaan/rt-thread/bsp/k230/rttpkgtool'...
......
Trying to download the opensbi source code ......
/home/u/ws/canaan/rt-thread/bsp/k230/rttpkgtool/output/src/opensbi does not exist, clone it from https://gitee.com/canmv-k230/opensbi.git
Cloning into '/home/u/ws/canaan/rt-thread/bsp/k230/rttpkgtool/output/src/opensbi'...
......
 AS-DEP    platform/kendryte/fpgac908/firmware/fw_payload.dep
......
 CC        lib/sbi/riscv_asm.o
......
 OBJCOPY   platform/kendryte/fpgac908/firmware/fw_payload.bin
~/ws/canaan/rt-thread/bsp/k230/rttpkgtool
Image Name:   rtt
Created:      Sun Apr 27 15:26:23 2025
Image Type:   RISC-V RISC-V OpenSBI Multi-File Image (gzip compressed)
Data Size:    391973 Bytes = 382.79 KiB = 0.37 MiB
Load Address: 00000000
Entry Point:  00000000
Contents:
   Image 0: 391965 Bytes = 382.78 KiB = 0.37 MiB
the magic is:  b'K230'
----- NO ENCRYPTION + HASH-256 -----
the encryption type:  0
mesg_hash:  b'7c469067ab0e5c3f9701f8dbd67ffe90f0213d14aa3ac262f7d9fdeff0343377'
/home/u/ws/canaan/rt-thread/bsp/k230/rttpkgtool
Generate the image file successfully!
The image file is located at /home/u/ws/canaan/rt-thread/bsp/k230/rttpkgtool/output/k230_rtos_01studio_defconfig/images/opensbi/opensbi_rtt_system.bin
第一次执行 build.sh 会自动 clone 下载 rttpkgtool 以及 opensbi 源码,并完整编译 opensbi 后再执行打包。以后执行 build.sh 只会增量打包。
如果希望重新下载 rttpkgtool 以及 opensbi,可以删除 rt-thread/bsp/k230 下的 rttpkgtool 目录后重新执行 build.sh 脚本即可。
5. 烧写内核
我们采用 SD 卡方式启动开发板,基于 SD 卡烧写内核的步骤可以大致分为两步:
- 制作基础 SD 卡。注意本步骤只要做一次,以后只要单独更新 RT-Thread 内核的镜像即可。
- 单独更新 RT-Thread 内核
5.1. 制作基础 SD 卡
在单独更新内核镜像之前,我们需要先制作一个基础的 SD 卡。可以参考 K230 RTOS Only SDK 用户指南中的 “如何编译固件”:https://developer.canaan-creative.com/k230_rtos/zh/dev/userguide/how_to_build.html 生成一个完整的 image。
假设 sdk 安装的路径在 $WS/rtos_k230。注意事项如下:
-
目前用户指南的环境只在 Ubuntu 20.04 LTS (x86_64) 上验证过,其他 Linux 发行版未经充分测试,可能存在兼容性问题。为避免和 BSP 构建环境冲突,建议在另外一台机器或者虚拟机中搭建此环境。
-
rtos_k230克隆自git@gitee.com:canmv-k230/manifest.git(国内用户建议从 gitee 下载,否则速度太慢),本文基于的 commit 是 75662ae。 -
根据指南步骤操作,在 “4.4 选择目标硬件配置” 中选择 01studio 的 defconfig。
和 01studio 相关的配置有两项:
$ make list-def
1 [ ] k230_canmv_01studio_defconfig
......
10 [*] k230_rtos_01studio_defconfig
其中:
- 1:01Studio 的带 micropython 的 canMV。
- 10: 01Studio 的不带 micropython 的 canMV。
为简单起见,这里选择 “ k230_rtos_01studio_defconfig” 。
构建完成后在 $WS/rtos_k230/output/k230_rtos_01studio_defconfig/ 下生成 RtSmart-K230_01Studio_rtsmart_local_nncase_v2.9.0.img
然后参考 K230 RTOS Only SDK 用户指南中的 “如何烧录固件”:https://developer.canaan-creative.com/k230_rtos/zh/dev/userguide/how_to_flash.html, 通过 SD 卡烧录。熟悉 Windows 平台的可以使用 balenaEtcher。烧录后,SD 卡上会自动分区和格式化。
5.2. 单独更新 RT-Thread 内核
我们可以利用 rttpkgtool 提供的脚本 sdcard.sh 快速更新 SD 卡中打包后生成的内核镜像 opensbi_rtt_system.bin。
先将 SD 卡通过 USB 读卡器接入 Ubuntu 机器。以下假设 USB 读卡器设备枚举为 /dev/sdb。如果不同请阅读 sdcard.sh 脚本代码。
为方便使用,在本 bsp 下提供了一份封装脚本 flashsd.sh 封装了对 rttpkgtool 的 sdcard.sh 脚本的调用。
$ cd rt-thread/bsp/k230 # 确保在本 bsp 目录下
$ ./flashsd.sh
BSP_PATH: /home/u/ws/canaan/rt-thread/bsp/k230
rttpkgtool already exists
~/ws/canaan/rt-thread/bsp/k230/rttpkgtool ~/ws/canaan/rt-thread/bsp/k230
Already on 'for-k230'
Your branch is up to date with 'origin/for-k230'.
Already up to date.
~/ws/canaan/rt-thread/bsp/k230
[sudo] password for u:
767+1 records in
767+1 records out
393140 bytes (393 kB, 384 KiB) copied, 0.121172 s, 3.2 MB/s
INFO: The kernel file has been flashed to the USB/SDcard successfully!
6. 上电启动
将 SD 卡插入 01Studio 开发板的 SD 卡槽。
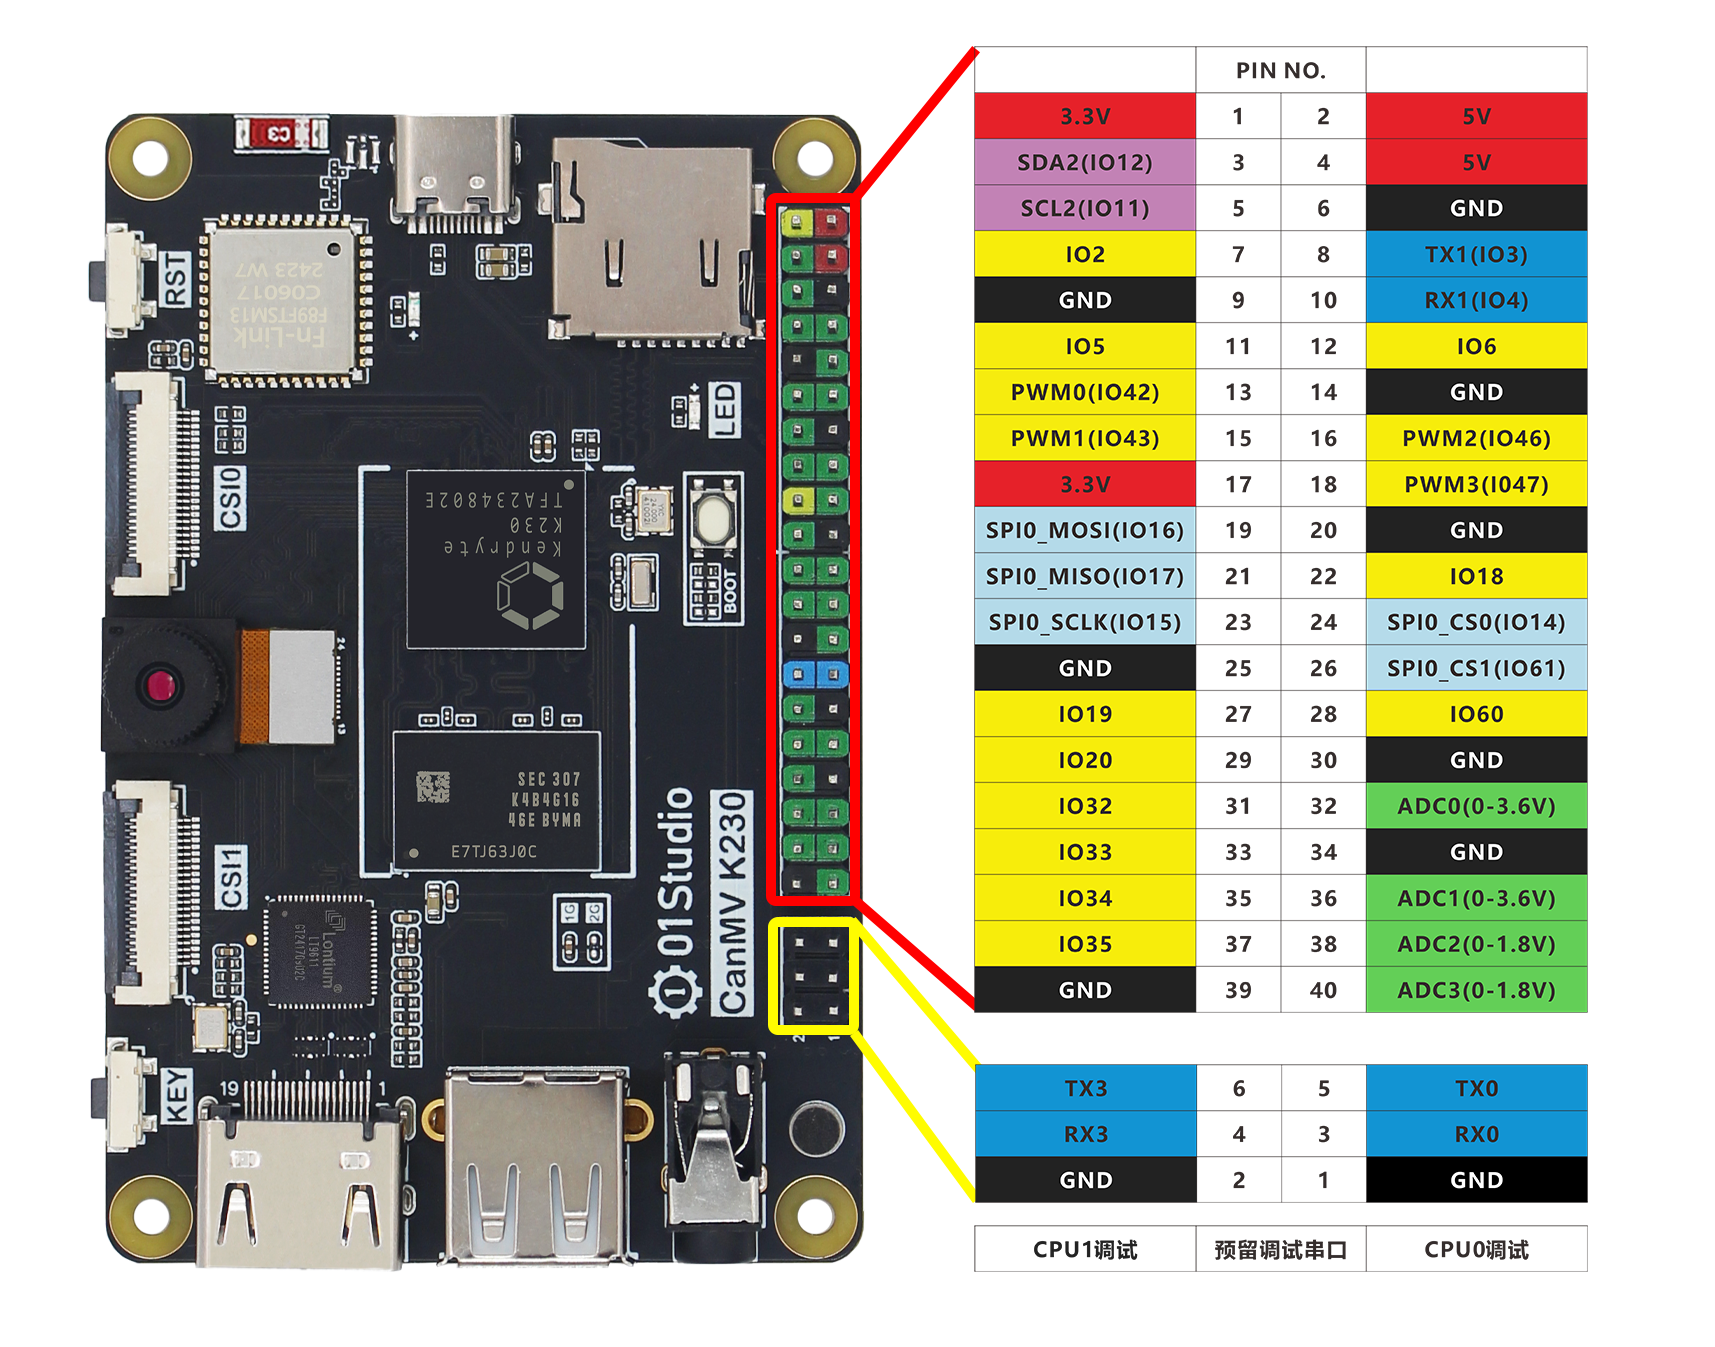
连接 USB 转 UART 串口线到 “CPU0 调试口”,具体见下图:
上电后串口控制台如下所示:
U-Boot SPL 2022.10-00015-gcf105752 (Apr 09 2025 - 22:49:49 +0800)
lpddr4 2660
00000000: PMU Major Msg: End of CA training
00000000: PMU Major Msg: End of initialization
00000000: PMU Major Msg: End of read enable training
00000000: PMU Major Msg: End of fine write leveling
00000000: PMU Major Msg: End of read dq deskew training
00000000: PMU Major Msg: End of MPR read delay center optimization
00000000: PMU Major Msg: End of Write leveling coarse delay
00000000: PMU Major Msg: End of write delay center optimization
00000000: PMU Major Msg: End of read delay center optimization
00000000: PMU Major Msg: End of max read latency training
00000000: PMU Major Msg: Firmware run has completed
image: uboot load to 0x1000000, compress=1 src=0x2aaaacff len=0x49e27


U-Boot 2022.10-00015-gcf105752 (Apr 09 2025 - 22:49:49 +0800)

CPU:   rv64imafdcvsu
Model: kendryte k230 canmv 01studio
DRAM:  1 GiB
Core:  22 devices, 13 uclasses, devicetree: embed
MMC:   mmc0@91580000: 0
Loading Environment from MMC... OK
In:    serial@91400000
Out:   serial@91400000
Err:   serial@91400000
Net:   No ethernet found.
Hit any key to stop autoboot:  0
image: rtt load to 0x0, compress=1 src=0x2aaaad07 len=0x5fb7b
Jump to big hart

OpenSBI v1.1-2-g1de130d

 \ | /
- RT -     Thread Smart Operating System
 / | \     5.2.1 build Apr 23 2025 16:04:02
 2006 - 2024 Copyright by RT-Thread team
lwIP-2.1.2 initialized!
[I/sal.skt] Socket Abstraction Layer initialize success.
[I/drivers.serial] Using /dev/ttyS0 as default console
CromFS mount failed!
Press any key to stop init process startup ... 3
Press any key to stop init process startup ... 2
Press any key to stop init process startup ... 1
Starting init ...
Hello RISC-V
msh />